Chronograph Shoot-Out
A Comparison of the LabRadar, MagnetoSpeed, and Two-Box Chrono
Which chronograph should I buy?
Most likely, you've been asked this question, heard it asked, or have asked it yourself. I certainly have.
It's no wonder, with so many options to choose from, each using different techniques and offering greater accuracy and precision than the rest. Since high-quality chronographs are an essential tool for the work I do here at Ammolytics, I thought it would be helpful and interesting to provide a direct comparison of some modern options. I already own a MagnetoSpeed V3 and some friends loaned me their LabRadar and Two-Box Chrono, which created an excellent opportunity test them head-to-head and to satisfy my own curiosity.
In late June, I took all three chronographs to the range. Two rifles were used to fire a total of 75 rounds; 25 rounds of 6.5mm Creedmoor (bolt-action/suppressed) and 50 rounds of .223 Remington (semi-auto).

Comparing the LabRadar, MagnetoSpeed V3, and Two-Box Chrono
This article is not a review of these devices – I won't be labeling any unit as "the best". That status tends to be too ephemeral, especially when products can be dramatically changed, for better or worse, with a simple firmware update. Instead, I'll present my observations and impressions, along with some constructive criticism, which I hope will help buyers to make informed purchases, manufacturers to improve their products, and users to better understand the capabilities and limitations of their equipment.
All raw datasets from this experiment have been published on GitHub.
Table of Contents
Disclaimers
- This article was shared with all three companies to review for mistakes. Any necessary corrections will be made and noted.
- Having personally owned a Magnetospeed V3 for years, I've had more time to become familiar with it. This may lead to some unconscious bias on my part.
- This isn't a comparison of ammunition or firearms, only the chronographs themselves.
- This comparison is based on the specific units tested and may not necessarily reflect the performance of similar models of the same brand.
Overview
As the name implies, a chronograph is a type of stopwatch. In context, it's a stopwatch that measures a bullet's velocity through the air. This is sometimes referred to as "muzzle velocity", but that's not necessarily correct (more on that later). The chronographs available today may use a variety of different sensors and techniques to measure how fast the bullet is traveling, but they each report the same information.
Historically, chronographs were set up downrange of the muzzle and relied on light sensors and screens to detect a passing bullet. While effective, this design had several flaws.
- Light sensors were finicky and sensitive to environmental conditions
- Shots had to be fired directly through a specific zone for accurate readings
- Going downrange could be troublesome at some ranges
- The setup and alignment process was tricky and time-consuming
- Improper alignment could lead to bad readings
- Accidental bullet strikes due to scope turret adjustments or improper zero were common
With a few exceptions, the chronographs I tested avoid most of these issues entirely by using new sensor types or techniques to measure bullet velocity. Here's a brief introduction to each of the devices that I tested (listed alphabetically):
LabRadar
The LabRadar is unique among consumer-grade chronographs since it measures the Doppler effect of a bullet. This creates some particularly interesting capabilities, such as being able to take several measurements as the bullet travels downrange without having to setup an array of sensors.
LabRadar is produced by Infinition, creator of very high-end Doppler radar systems commonly used by various manufacturers to measure the ballistic performance of their products. This says something about the usefulness of Doppler-based devices.
MagnetoSpeed V3

The original MagnetoSpeed chronograph was released in 2012 and it was the first of its kind to use both a bayonet-style mount and electromagnetic sensors which avoided the light screens that plagued chronographs of the past. The company has iterated on the design ever since, and today offers the V3 as well as the more cost-effective Sporter model.
One thing that I've found to be exceptionally helpful is the level of technical detail the company provides on their website and in the owner's manual describing exactly how their devices work and their manufacturing tolerances.
Two-Box Chrono
Update: This product has been discontinued by the manufacturer and the links have been taken down.
The Two-Box Chrono is the newest of the three devices I tested and it offers a combination of features from other popular chronographs: Acoustic sensors, as used in the SuperChrono and variable sensor spacing, similar to the venerable Oehler Model 35P.
It's notable that the separate sensor units (boxes) are connected only by a cable with distance markers, rather than the standard rigid design used in most chronographs. The website for this unit claims greater precision with a stated error rate of 0.02% when using the maximum sensor length of 15 feet.
A Brief Word About Cost
Some may scoff at the list price for some of the devices discussed here, or other competitive options.
- How hard is it to make a chronograph, anyway?
- Aren't electronic components super cheap?
Well, there's a common saying in engineering circles:
The first 80% of development is the easy part. The hard part is the next 80%.
The point is that it's easy to be dismissive of how much work is required for a given project, especially before you've really given it some thought. Please, be mindful of the development and support costs for any piece of tech. The final product that you can buy likely bears little resemblance to the many prototypes that came before it. Building and testing prototypes takes time, and time is money.
The basic chronograph software itself is usually not complex. The majority of time and energy is spent building all of the ancillary stuff. User Interfaces, bug fixing, metric and US customary units, mobile app, wireless networking, bug fixing, archiving, statistical calculations, firmware updates, settings, and more bug fixing.
All of this takes a lot of time to develop and test. Not to mention regulatory licences and approvals (FCC, for example).
Furthermore, these companies typically sell one unit per customer who hopes that it will last for years. This puts a burden on the company to support it with bug fixes and new features. If you have to contact them for support or send your unit back to get serviced, you likely aren't paying for their time. So, when you see the price tag, remember that all of this has been factored in.
The most important thing to take away from this is that, like any quality tool, chronographs are designed to make it easy for you to measure and quantify aspects of your firearm and ammo with confidence. Personally, I find my chronograph to be invaluable and I'm happy to pay a few hundred dollars for the information it provides and the time it saves.
Terminology
There are a few terms you should be familiar with when discussing chronographs and reading this article.
- Actual Velocity
- The true velocity of a bullet in flight.
- Adjusted Velocity
- A velocity that's been adjusted for decay to account for the distance between a chronograph and the muzzle.
- Instrument Velocity
- The velocity of a bullet as measured by a chronograph, which may not match actual velocity due to a variety of factors.
- Muzzle Velocity
- The velocity of a bullet at the moment it leaves the muzzle of a barrel.
- Velocity Decay
- The loss of velocity during flight due to air resistance and other factors.
Why Chronographs Matter: A Practical Example
I've used chronographs as a data-collection tool in experiments to test various hypotheses on this site, such as the effects of free-recoil on muzzle velocity and bullet sorting. However, those aren't reflective of the normal uses for these devices.
The most popular use-cases for chronographs are:
- Measure the average velocity of ammunition to calculate ballistic performance for elevation and windage
- Measure the precision of ammunition velocities to fine-tune handloads or determine hit-probability
I used both of these this summer as I prepared to compete in the National Rifle Matches at Camp Perry, OH. The target distances and ring diameters for the Service Rifle competitions are:
| Target | Distance (yd) | X Ring (in) | 10 Ring (in) |
|---|---|---|---|
| SR | 200 | 3.0 | 7.0 |
| SR-3 | 300 | 3.0 | 7.0 |
| MR-1 | 600 | 6.0 | 12.0 |
My goal was simple: Develop a handload that was capable of 0.25 MOA at 600 yards using the 80gr Sierra MatchKing bullets.
Now, you might think that it'd be enough to fire 10 rounds at 100 yards and measure the group size. Unfortunately, this process measures the combined effects of the load and your marksmanship (among other things). At 100 yards, the latter can have a significantly greater impact on group size than the former. A ballistic calculator can be used to estimate the vertical spread caused by velocity, which may convince you if you find this controversial.
During this experiment, 10 rounds were loaded with this bullet and a reasonable charge weight (24gr Varget). Here are the statistics from the chronograph:
- Mean: 2720 ft/s
- Min: 2696 ft/s
- Max: 2765 ft/s
- Range: 69 ft/s
- Standard Deviation: 20.5 ft/s
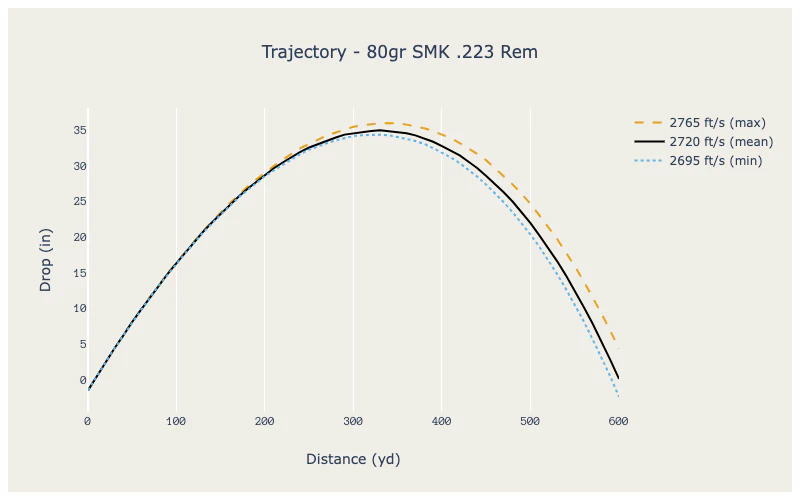
Next, I used the JBM Ballistics calculator and plotted the trajectory based on the mean (average) muzzle velocity, with a corrected elevation (15.5 MOA) to hit a 600 yard target. To visualize the dispersion, I also added the trajectory of the velocity range (sometimes called "extreme spread", 69 ft/s in this case) – that is, the fastest (2765 ft/s) and slowest (2696 ft/s) velocities recorded in that group.
Note: Typically, I would plot one standard deviation faster and slower than the median velocity to avoid noise from outliers. In a future article, I'll cover the statistics of chronographs in greater detail.
 interactive_space Open Interactive Chart
Notice that the spread is barely visible until around 200 yards where it would maintain a 0.25 MOA (0.5 inch) group. By 300 yards, it spreads to a 0.41 MOA (1.3 inch) group, which would be perfectly serviceable if I were shooting this round at those distances. Had I only shot and measured groups at 100 yards, the velocity would account for an indistinguishable 0.1 MOA (0.1 inch) and that's simply not representative of its performance at the intended distance.
Let's get back to the point, which is to demonstrate the effects that velocity spread has on group sizes at a 600 yard target. This is where things really fall apart. The ballistic model based on chronograph data estimates a vertical spread of 1.07 MOA (6.7 inches) at 600 yards, just from variation in velocity! Adding in other critical factors like wind, the rifle, and marksmanship; I could certainly expect much worse results.
Here's what I learned from this simple example using only 10 rounds and a chronograph:
- Measuring group sizes would not have been a reliable indicator of a good load at 100 or even 200 yards
- This load had too much velocity dispersion to be competitive at 600 yards and required tuning
How I Compared
Comparing chronographs comes with an inherent problem: you don't know the true velocity for each shot. That's not really the problem I'll be focusing on here because I think it's still valuable to compare the relative velocities reported by each unit for every shot fired. If more than one device generally agrees on the reported velocity, then we'll have confidence that they are working as expected as well as indicators of their accuracy and precision.
In some ways, this test was more straightforward than some of my previous experiments. I set up all three chronographs according to the instructions (which I did read) to fire two calibers with two rifles, prone, at a 200 yard target.

Set up for the 6.5mm Creedmoor bolt-action
First I fired 25 rounds of 6.5mm Creedmoor with a suppressed bolt-action rifle. The MagnetoSpeed was mounted using the MK Machining Gen III mount, which I took the time to carefully align the day before. The Two-Box Chrono was setup with a 10 foot configuration, with the first box about 4 feet from the muzzle. The LabRadar was pointed at the target and positioned as close to the muzzle of the suppressor as I could. Finally, the Pressure Trace II system was enabled and connected to the laptop to record chamber pressure data.
Next, the MagnetoSpeed was attached to the semi-auto .223 Remington rifle with the standard barrel mount to fire another 50 rounds (10 each of different loads). I did not have a chamber pressure gauge attached to this rifle.

Set up for the .223 Remington smi-auto
Specifics about the firearms and ammunition can be found over on GitHub, along with the raw datasets.
Overall, the test went smoothly. The range I used was completely empty, the weather was ideal, and I had no issues at all with the firearms or ammunition. There were a few hiccups and some data was lost, but nothing catastrophic.
Goals
With any experiment, setting goals can provide direction and define both success and failure. Here are the goals I had for this test:
- Measure the velocity for each round fired with all three chronographs
- Compare those measurements individually and collectively
- Compare the reported statistics from each device
- Recompute the statistics to check correctness
- Measure the chamber pressure to compare with velocities
- Note any device quirks, difficulties, or failures
What Could Have Been Better
- I started a round-robin firing order with the semi-auto .223 Remington, but stopped a few rounds in after deciding it was too complicated
- I should have fired separate 10-round groups for a better comparison of individual velocities and statistics
- LabRadar failed to record the first two rounds of 6.5mm Creedmoor due to the suppressor, so I had to change the triggering and sensitivity settings to measure the rest
- I should have fully charged the LabRadar battery pack, which died after the 29th round of .223 Remington
- Two-Box Chrono recorded significantly slower than the other chronographs and I'm not certain why
Want to see more articles like this?
The generosity of our supporters keeps this site ad-free. It also affords me the components, equipment, and time needed to conduct these experiments and produce great content for everyone.
Check out my Patreon page to learn more about the benefits of supporting Ammolytics. Your support keeps Ammolytics going!
Results
The charts are intended to visually compare the results from each device and hopefully are easier to comprehend. The tables may help to assess the precision of each device by comparing the standard deviation values for each 10-round group. I've focused on 10-round groups where data was not lost by any of the three chronographs.
Without a way to measure the true velocity for each round, I cannot objectively quantify the relative accuracy and precision for individual chronographs. I'll leave it up to you, the reader, to judge for yourself.
6.5mm Creedmoor
 interactive_space Open Interactive Chart
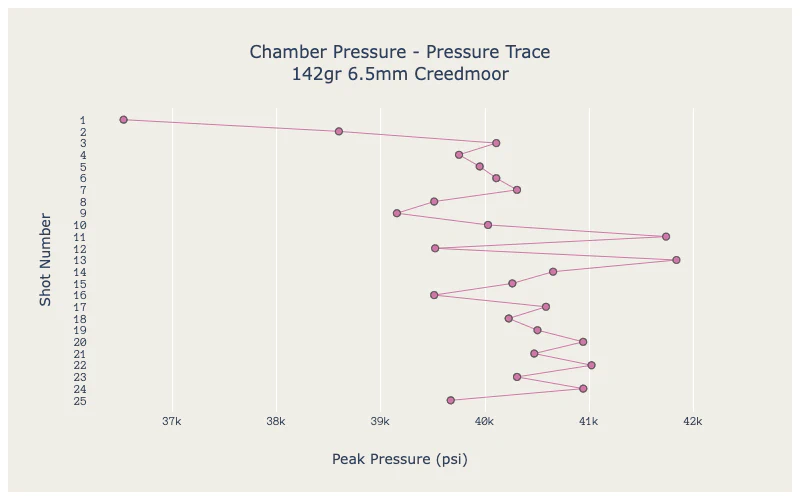
The peak chamber pressure can indicate whether the relative shot velocity should be high or low.
 interactive_space Open Interactive Chart
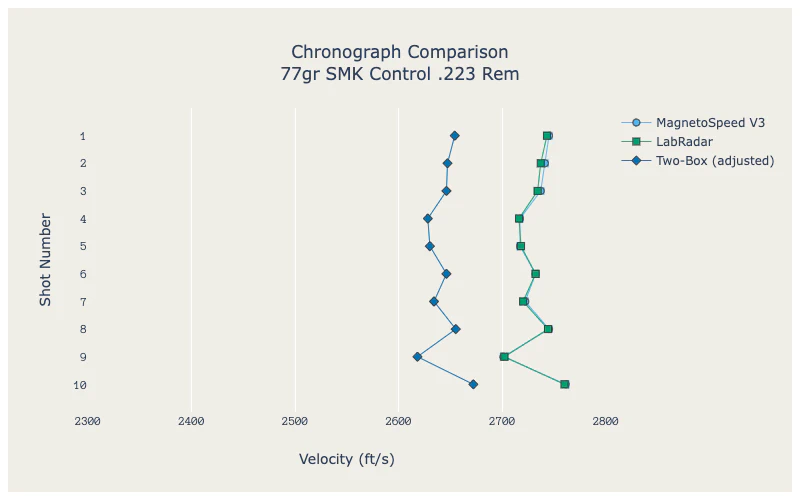
The first two rounds were not recorded by the LabRadar. The Two-Box Chrono values were adjusted for velocity decay.
The following are consecutive 10-round samples from the 6.5mm Creedmoor group. I've separated these to provide a comparison that's easier to understand and not skewed by missing data.
| Shot | LabRadar (ft/s) | MagnetoSpeed (ft/s) | Two-Box Adj. (ft/s) | Mean |
|---|---|---|---|---|
| 6 | 2751 | 2744 | 2673 | 2722.71 |
| 7 | 2762 | 2755 | 2682 | 2733.05 |
| 8 | 2755 | 2747 | 2674 | 2725.38 |
| 9 | 2751 | 2748 | 2679 | 2726.05 |
| 10 | 2758 | 2753 | 2683 | 2731.38 |
| 11 | 2765 | 2754 | 2684 | 2734.38 |
| 12 | 2754 | 2746 | 2674 | 2724.71 |
| 13 | 2775 | 2770 | 2694 | 2746.38 |
| 14 | 2753 | 2742 | 2675 | 2723.38 |
| 15 | 2764 | 2754 | 2686 | 2734.71 |
| ______ | ______ | ______ | ______ | ______ |
| Mean | 2758.80 | 2751.30 | 2673.40 | 2730.21 |
| Median | 2756.50 | 2750.50 | 2673.50 | 2728.71 |
| SD | 7.69 | 8.01 | 6.72 | 7.32 |
| Shot | LabRadar (ft/s) | MagnetoSpeed (ft/s) | Two-Box Adj. (ft/s) | Mean |
|---|---|---|---|---|
| 16 | 2749 | 2742 | 2670 | 2720.38 |
| 17 | 2758 | 2750 | 2678 | 2728.71 |
| 18 | 2748 | 2740 | 2670 | 2719.38 |
| 19 | 2753 | 2742 | 2674 | 2723.05 |
| 20 | 2764 | 2757 | 2687 | 2736.05 |
| 21 | 2742 | 2733 | 2663 | 2712.71 |
| 22 | 2761 | 2753 | 2679 | 2731.05 |
| 23 | 2754 | 2748 | 2675 | 2725.71 |
| 24 | 2756 | 2751 | 2681 | 2729.38 |
| 25 | 2755 | 2748 | 2679 | 2727.38 |
| ______ | ______ | ______ | ______ | ______ |
| Mean | 2754.00 | 2746.40 | 2668.60 | 2725.38 |
| Median | 2754.50 | 2748.00 | 2669.50 | 2726.55 |
| SD | 6.46 | 7.11 | 6.77 | 6.70 |
.223 Remington 77gr SMK (Control)
 interactive_space Open Interactive Chart
| Shot | LabRadar (ft/s) | MagnetoSpeed (ft/s) | Two-Box Adj. (ft/s) | Mean |
|---|---|---|---|---|
| 1 | 2743 | 2745 | 2661 | 2716.40 |
| 2 | 2737 | 2741 | 2654 | 2710.73 |
| 3 | 2734 | 2737 | 2653 | 2708.07 |
| 4 | 2716 | 2717 | 2635 | 2689.40 |
| 5 | 2718 | 2717 | 2637 | 2690.73 |
| 6 | 2732 | 2732 | 2653 | 2705.73 |
| 7 | 2720 | 2722 | 2641 | 2694.40 |
| 8 | 2744 | 2745 | 2662 | 2717.07 |
| 9 | 2702 | 2701 | 2625 | 2676.07 |
| 10 | 2760 | 2761 | 2679 | 2733.40 |
| ______ | ______ | ______ | ______ | ______ |
| Mean | 2730.60 | 2731.80 | 2650.20 | 2704.20 |
| Median | 2733.00 | 2734.50 | 2653.20 | 2706.90 |
| SD | 16.85 | 17.62 | 15.78 | 16.72 |
.223 Remington 77gr TMK
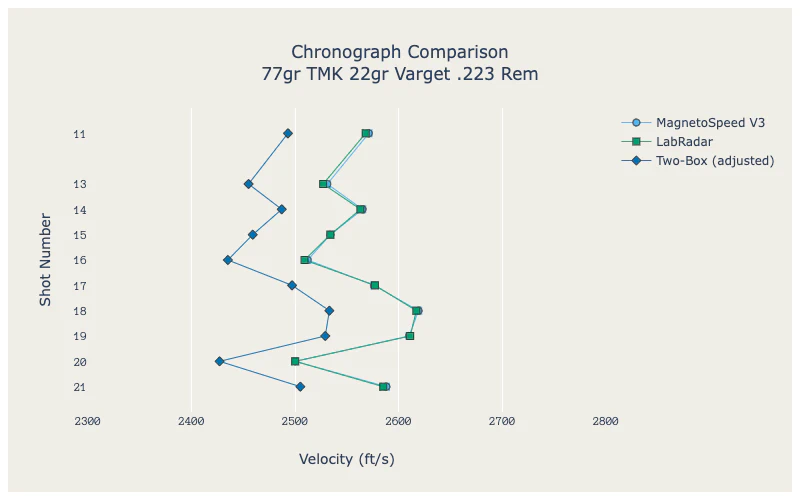 interactive_space Open Interactive Chart
Note: Shot 12 was a 80gr SMK which was fired as part of a round-robin, which was abandoned.
| Shot | LabRadar (ft/s) | MagnetoSpeed (ft/s) | Two-Box Adj. (ft/s) | Mean |
|---|---|---|---|---|
| 11 | 2568 | 2571 | 2500 | 2546.25 |
| 13 | 2527 | 2531 | 2462 | 2506.58 |
| 14 | 2563 | 2565 | 2494 | 2540.58 |
| 15 | 2534 | 2534 | 2466 | 2511.25 |
| 16 | 2509 | 2512 | 2442 | 2487.58 |
| 17 | 2577 | 2576 | 2504 | 2552.25 |
| 18 | 2617 | 2619 | 2540 | 2591.92 |
| 19 | 2611 | 2610 | 2536 | 2585.58 |
| 20 | 2500 | 2500 | 2434 | 2477.92 |
| 21 | 2585 | 2588 | 2512 | 2561.58 |
| ______ | ______ | ______ | ______ | ______ |
| Mean | 2559.10 | 2560.60 | 2488.75 | 2536.15 |
| Median | 2565.50 | 2568.00 | 2496.75 | 2543.42 |
| SD | 40.54 | 40.26 | 36.82 | 39.19 |
.223 Remington 80gr SMK
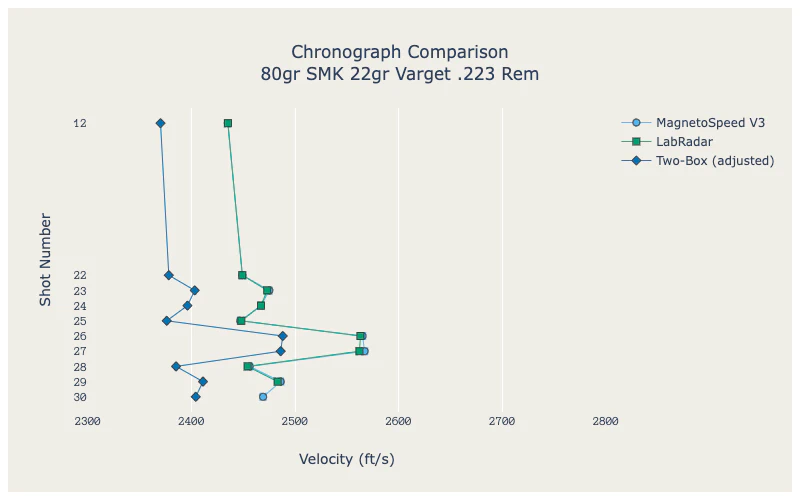 interactive_space Open Interactive Chart
No table is provided here because the last round was not recorded by the LabRadar.
Verifying Statistics
Due to the shots lost by the LabRadar, I don't have a complete set with which I can compare the statistics across all three devices. Instead, I've taken the stats from each and compared to the results of recalculating them myself with a statistics software package. This should at least provide some insight into the correctness of each device's arithmetic.
| LabRadar | Recalculated | Delta | |
|---|---|---|---|
| Mean | 2756.21 | 2756.086957 | -0.123043 |
| SD | 6.78 | 6.874942 | 0.094942 |
| Range | 32.44 | 33 | 0.56 |
| Min | 2742.11 | 2742 | -0.11 |
| Max | 2774.55 | 2775 | 0.45 |
The first thing that stands out is the different level of precision than the reported velocities, as you can see in their Max and Min values. I suspect that the LabRadar firmware isn't rounding for all fields when generating the output, which would explain some of these discrepancies.
Overall, the math they are using is fairly close to the true values but there is some room for improvement.
| MagnetoSpeed | Recalculated | Delta | |
|---|---|---|---|
| Mean | 2746 | 2746.28 | -0.28 |
| SD | 10.1 | 10.240931 | 0.140931 |
| Range | 49 | 49 | 0 |
| Min | 2721 | 2721 | 0 |
| Max | 2770 | 2770 | 0 |
The only number that seems off is the Standard Deviation, though the difference is negligible. The MagnetoSpeed firmware seems to be rounding to whole numbers in all other cases, which is perfectly adequate.
Observations and Impressions
There aren't really any solid conclusions I can draw here – it's just not that type of experiment. The type of chronograph you choose will depend on your preferences, needs, and budget, which differ for every individual. Instead, I'll provide you with some quick thoughts about each unit.
LabRadar
The LabRadar is a fascinating chronograph and, as someone who geeks out about data, I'm really excited about its potential. As of the time of writing, I believe the software needs a bit more work to make it easier to use, I'd like to be more confident that suppressed rounds won't be lost, and the documentation could be much more clear about the limitations and underlying mechanics. That said, the ability to take multiple measurements of bullet velocities without going downrange or affecting the firearm's performance is really amazing, especially for under $600.
I don't own a LabRadar today, but I will definitely consider it.
Magnetospeed V3
This was an interesting test for me to compare how my trusty MagnetoSpeed V3 would hold up to more modern chronographs. I'm not disappointed at all by its performance. If you're overly concerned about barrel harmonics and don't want to buy an aftermarket mounting option, it may not be the right choice for you. As someone who frequently does load development at busy ranges, not having to go downrange, only making adjustments when the range is cold, and being able to properly align the sensor bayonet beforehand are all huge time-savers.
Overall, the MagnetoSpeed provides reliable data for a great price and I look forward to future innovations on this product.
Two-Box Chrono
After using the ShotMarker, I was really excited to see how well acoustic sensors would perform in this application. The Two-Box Chrono certainly is an interesting chronograph design and I'm sure that it could be a helpful tool for reloaders and marksmen who are primarily focused on load development. While it lacks some of the features of other chronographs, and wasn't as accurate as the LabRadar or MagnetoSpeed (we'll chalk that up to tilted sensor), it did report lower standard deviations – this indicates that the longer-spaced sensor design may be effective at reducing noise and providing more precise results.
For me personally, I prefer chronographs which provide results as a data file that I can transfer to my computer and don't require going downrange. As such, the Two-Box Chrono design simply doesn't fit with my preferences or use-cases.
LabRadar Quirks
#1: Sighting
The case of the LabRadar includes a small notch on the top which is intended for aligning the unit with the target. In practice, this notch is entirely too coarse, especially when shooting at longer distances where the neighboring targets appear closer together.
There are some aftermarket solutions available, such as this 3D-printed sight from MK Machining. I opted to use a bit of hot glue to attach a small aluminum tube. This worked quite well and gave me much more confidence that I was aiming at the correct target.

A quick fix to improve the LabRadar sight

Sighting in the LabRadar becomes much easier
I'd like to see this feature improved by the manufacturer since it's stated as being critical to the performance of the unit and yet rather difficult given the existing design. I suspect this could be greatly improved rather inexpensively.
#2: Arming
The LabRadar needs to be "Armed" before firing, so that it knows it should begin recording bullet velocities. This differs from every chronograph I've ever used, so I've forgotten to arm it on several occasions, leading to lost data.
Arming the unit also activates a timer which will automatically disarm the unit after a configurable period of time (10 - 600 seconds) if no shots are detected. Presumably, this Armed/Disarmed mode is intended to conserve battery life of the unit and perhaps to reduce the amount of microwave radiation exposure to folks who may be walking to the targets during a ceasefire.
The unit itself uses a fairly bright LED that is orange when armed and blue when disarmed. I appreciate the colorblind-accessible choices, though I've still missed this visual indicator and fired rounds after it disarmed itself.
#3: Triggering
In addition to arming the unit, it includes sensors which detect a shot and trigger the radar. There are two Trigger Source options available:
- Trigger (microphones)
- Doppler
There are two internal microphones inside the LabRadar body and it has an external microphone accessory, which is supposed to be more sensitive for things like airguns. This external mic wasn't provided to me by the owner, so I can't speak to its effectiveness.
The trigger sensitivity can also be changed. This setting uses a 1 - 5 scale where, counter-intuitively, 1 is the most sensitive and 5 is the least sensitive.
In my tests, I've experienced problems with triggering the LabRadar when firing a suppressed rifle. You'll note that the first two rounds of 6.5mm Creedmoor were not recorded. The instructions include helpful illustrations about correct muzzle orientation in relation to the LabRadar. Setting the correct position may be easier if you have a range buddy who can inspect and adjust while you are holding the firearm and aiming at the target. Regardless, I've had little luck even with increasing the trigger sensitivity. Despite the user manual's advice against it, I relied on the Doppler trigger for the remainder of the suppressed rounds.
While I admit that I didn't bring enough ammo to run through an extended trial/error set-up period before conducting this experiment, I also believe that more could be done by the manufacturer to improve the performance and avoid lost data, especially for suppressed firearms. After all, if users wish to test cold-bore shots, they need the confidence that those shots will register.
#4: Mobile App/Bluetooth
The free LabRadar mobile app (available for both iOS and Android) is quite helpful in that it acts as a remote control for the unit which will be just out of reach when you're lying prone behind a rifle. It gives you the ability to arm/disarm the device, change some settings, and review some of the data that it recorded.
Bluetooth LE (low energy) is used for the wireless connection between the LabRadar and the mobile app. This is an excellent protocol to use for low-bandwidth operations and it avoids the painfully clunky pairing step that used to haunt Bluetooth devices in the past. Unfortunately, the LabRadar mobile app suffers in a few significant ways.
First, the connection is quite laggy. Based on experience, my guess is that the creators decided to sync all recorded data between the app and the device, which is not optimal for a low-bandwidth connection. The more you use the LabRadar, the slower you can probably expect the mobile app to seem as it will have an increasing amount of data to sync.

Waiting for the LabRadar to transfer data over Bluetooth
Second, the interface is not intuitive. The first screen shows a list of Devices and Memories. If you wish to review the data from a previous session, you can click on a Memory from the list which corresponds to a LabRadar device you've previously connected to. For some reason, they decided to use a Trash Can icon next to the memory on this list, which makes one think that tapping on it may delete it. Users should have the option to delete it, but that's rarely Plan A – the option shouldn't be available until after the Memory has been selected/viewed.

Main view of the LabRadar app
#5: Battery Life
The folks at LabRadar did an excellent job of not only including an internal battery compartment but also providing a USB port for a rechargeable battery pack. This gives the user a lot more flexibility for powering the device.
I did bring along the battery pack (from the owner of the device) when conducting this test which was at least 75% charged. It simply wasn't enough, however, as it had been completely drained by the 54th round (just over an hour of use) and powered off. Once again, data was lost.
I go back and forth on how much to hold this against LabRadar. They are clearly mindful of the energy requirements of the unit and went to a lot of trouble to include power-saving features. It would be helpful for the company to provide guidance on the power requirements for expected runtimes so that users can choose an appropriately sized battery.
#6: Reported Distances and Velocities
When reviewing the LabRadar Track files, the nearest reading from any dataset is around 6 yards (0.007021 seconds). Every subsequent reading is exactly 0.001 second increments and roughly one yard. What's notable about this is that LabRadar appears to insert a velocity value at distance/time zero, which would make one believe that it's recording muzzle velocity. This is also the value that the LabRadar interface displays as the muzzle velocity during use.
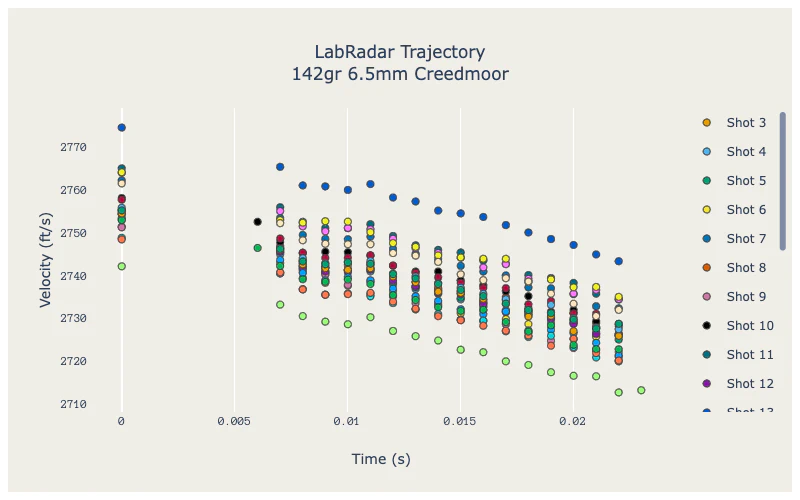 interactive_space Open Interactive Chart
In the following chart, I plotted a linear fit for each shot trajectory except the supposed muzzle velocity. As far as I can tell, this is appears to be the model used by the LabRadar to estimate a muzzle velocity that it does not actually measure. For nearly every round I fired, this estimated velocity was higher than what the MagnetoSpeed measured.
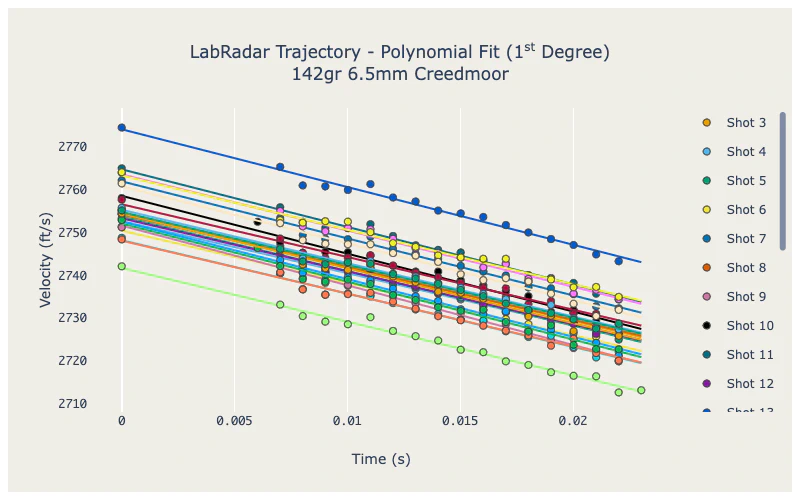 interactive_space Open Interactive Chart
What's more, the LabRadar allows for measurements at user-defined distances, including below the 6 yard starting point discussed above. I selected distances of 1, 2, 3, 5, and 10 yards for this test and was surprised to see the Report data included them without any corresponding readings in the Track files. This leads me to believe that some velocities in the Report are estimated, not measured.
You can see a clear example of this in samples of the .223 Remington datasets below.
LabRadar Report: .223 Remington - 77gr SMK / 24gr Varget
Compare the velocities of Shot 1 with the Trajectory table below.
| Shot | 0yd (ft/s) | 1yd (ft/s) | 2yd (ft/s) | 3yd (ft/s) | 5yd (ft/s) | 10yd (ft/s) |
|---|---|---|---|---|---|---|
| 1 | 2743 | 2741 | 2738 | 2736 | 2731 | 2719 |
| 2 | 2737 | 2735 | 2732 | 2730 | 2725 | 2713 |
| 3 | 2734 | 2732 | 2729 | 2727 | 2722 | 2709 |
| 4 | 2716 | 2714 | 2711 | 2709 | 2704 | 2692 |
| 5 | 2718 | 2716 | 2713 | 2711 | 2706 | 2694 |
| 6 | 2732 | 2730 | 2728 | 2725 | 2720 | 2708 |
| 7 | 2720 | 2718 | 2716 | 2713 | 2709 | 2697 |
| 8 | 2744 | 2742 | 2739 | 2737 | 2732 | 2720 |
| 9 | 2702 | 2700 | 2697 | 2695 | 2691 | 2680 |
| 10 | 2760 | 2757 | 2755 | 2752 | 2748 | 2736 |
Complete dataset available on GitHub
LabRadar Trajectory of Shot 1
Note: The SNR column is Signal to Noise Ratio, though I could not find any documentation about how to interpret the values.
| Time (s) | Vel (ft/s) | Dist (yd) | SNR |
|---|---|---|---|
| 0.000000 | 2743.25 | 0.00 | - |
| 0.007021 | 2725.53 | 6.40 | 31.74 |
| 0.008021 | 2724.25 | 7.31 | 29.54 |
| 0.009021 | 2723.75 | 8.21 | 27.36 |
| 0.010021 | 2722.39 | 9.12 | 23.49 |
| 0.011021 | 2719.29 | 10.03 | 25.50 |
| 0.012021 | 2715.12 | 10.93 | 26.20 |
| 0.013021 | 2716.15 | 11.84 | 21.98 |
Complete dataset available on GitHub.
Frankly, I find this confusing. The user manual and website make no mention of these discrepancies. If you search around online, you'll find plenty of similar discussions and bits of pieces of information from conversations that owners have had with the manufacturer.
I'd like the company to be more upfront and transparent about their product's true capabilities and avoid this confusion altogether. Every device will have some limitations and measuring true muzzle velocity appears to be one of the LabRadar.
MagnetoSpeed Quirks
#1: Harmonics & Impact Shift
A common complaint about the MagnetoSpeed is that it attaches directly to the barrel. Nearly every book and article about precision rifles that I've come across mentions the importance of free-floating a rifle's barrel in order to maximize its potential, so this attachment method really goes against the grain and is just too much for some folks to handle.
I haven't personally seen dramatic impacts of the precision of my firearms while the MagnetoSpeed bayonet was attached. There is a small Point-of-Impact shift, but it's consistent enough that it can be dialed out with the scope turrets. I've also seen F-Class competitors shoot clean 200 scores at 600 yards with the bayonet attached. The point is, while it has some effect, it's negligible.
Bryan Litz has this to say:
Mounting the MagnetoSpeed to your barrel may be alarming to some shooters who use a chronograph for load development due to the possibility of its affecting barrel harmonics. This aspect of the MagnetoSpeed was not specifically tested during this study, but I can say that I haven't noticed a significant shift in zero for the rifles I've used it on.
If it still bothers you, some aftermarket mounting options are available:
For this experiment, I used the MK Machining Gen III mount. With a 5/8 inch diameter rod, it's very robust and keeps the bayonet close, but isolated from the barrel. The trade-off is that it takes a bit more time and effort to get it correctly positioned and aligned than the standard strap mount.
#2: Tightening the Strap
All of MagnetoSpeed's bayonet-style chronographs, including the V3, use a nylon strap and tensioning system to attach to the barrel. This is a pretty ingenious design as it's relatively simply to manufacture and allows for a nearly universal fit. The specific quirk isn't so much a fault of the design, but of the hardware components. I've personally had the strap come loose, and I know others who have as well. In the chapter about chronographs in Modern Advancements in Long Range Shooting: Vol 1, Bryan Litz mentioned that his MagnetoSpeed bayonet may also have come loose during his test (emphasis added).
For the MagnetoSpeed, moving the rifle should have no effect since the sensors are mounted to the barrel. However you can see that the average error grows from 1.0 fps, to 2.0 fps, to 2.5 fps as the test progresses. This is not an alarming amount of error, but the consistent trend begs the question why? One possibility is that the mounting strap worked loose and the unit was allowed to rotate slightly out of alignment as the test progressed. Having the sensor come increasing out of alignment would decrease the effective sensor spacing, thereby indicating slightly faster speeds which decrease the effective sensor spacing, thereby indicating slightly faster speeds which is what we see in the results, so that's a plausible explanation.
First, the strap cam/buckle has some teeth that are supposed to prevent the nylon strap from slipping out. In my experience, these teeth are not quite aggressive enough to really lock down and tend to slip when tightening the knob.

The MagnetoSpeed tensioner could be be grippier to prevent slipping
Second, the plastic/polymer frame that the tensioning system attaches too doesn't inspire a ton of confidence. My personal approach is to try and get the strap attached as tight as I possibly can and in so doing, I sometimes worry that I might break the frame. I'm speculating, but the flex in this frame may lead some to not tighten the knob as tight as they should, which may allow it to loosen more under recoil. A less flexible frame, perhaps metal, would be a welcome addition.
#3: Timeless
On several occasions, I've looked come across an old dataset from my MagnetoSpeed and wondered when it was from and what firearm/ammo I was using. Usually, I will copy the LOG.CSV file from the microSD card and rename it to something that includes a date and time, if not more information. Including a date for every recorded Series is one software improvement that I'd love to see on the MagnetoSpeed.
Ideally, a timestamp would be included for every shot fired, like the LabRadar offers. This allows users to track velocity spreads as their barrel heats up, and how much the velocity might settle after the barrel has cooled for a certain period of time. If you'd like to see an example of this, check out my article about Bullet Sorting.
#4: Dongle Life
Moving data from the chronograph to a computer has been a long-standing challenge. Most modern chronographs like the MagnetoSpeed V3 solve this by including removable storage – in this case a microSD card. Modern smartphones don't have a microSD slot however, making it difficult to scratch the itch to analyze data immediately. In 2014, MagnetoSpeed aimed to solve this problem with their XFR accessory, which plugs into the head unit and can plug into the headphone jack of your phone, allowing their free mobile app to read all the data stored on the microSD card.
Unfortunately, smartphone manufacturers have started to drop support for the headphone jack, requiring the use of adapter cables (dongles). While frustrating, I can't fault MagnetoSpeed for the decisions made by smartphone manufacturers. I did want to mention it for anyone who might really need to review their data in the field and owns an afflicted phone. Be sure to pack a spare headphone dongle.

Phones without headphone jacks will require a dongle for the optional XFR accessory
Two-Box Chrono Quirks
#1: Internal Storage
Perhaps the biggest flaw with the Two-Box Chrono, in my opinion, is it's lack of removable storage. While I can appreciate the lean towards simplicity, this design decision sacrifices the most important and limited resource of all – a person's time. Because the recorded data is not stored on a media that can be easily transferred to a computer, it requires the owner to review each and every shot. One. At. A. Time.
How painful is it? Well, remember that I borrowed this unit from a friend. I didn't want them to lose any data, so I offered to back it up for me. Without an SD card to remove and copy, this meant going through each of the 500 shots they had recorded, with the remote, and entering them manually into a spreadsheet.
Moving the data from the Two-Box Chrono and into a spreadsheet or other software not only becomes a tedious chore, but it also introduces a significant risk of entry error. Would you know if you had accidentally entered 2754 instead of 2745? If you're second guessing every piece of data, then what good is it?

Retrieving your data on the Two-Box Chrono can be tedious
#2: Just the Basics
A good chronograph can tell you a lot about your ammunition and firearms, especially when the data collected is viewed statistically. The Two-Box Chrono falls a bit short since it doesn't do any of the calculations for you. Instead, it's software is entirely focused on collecting/reviewing measurements and changing the device settings.
Further, the Two-Box Chrono software does not support the concept of "archived" data or "series". This puts the burden on the user to keep track of the recorded shot number for each measurement to be managed later.
I'd like to see improvements to the software to make some of this easier for the user, but without any external data ports, I don't think firmware updates are possible on this device.
#3: Set Up and Leveling
This experiment wasn't my first use of a Two-Box Chrono. Previously, it had been set up at our 600 yard line for a few of us to try. What I learned that night was that if the boxes aren't level, then it can easily detect shots from the neighboring lane. When backing up the data, there were several entries above 4800 ft/s! I know for a fact that nobody on that range has a gun that hot – the Two-Box was combining simultaneously-fired shots from multiple lanes.
| Shot | Velocity (ft/s) |
|---|---|
| 1 | 2880 |
| 2 | 2765 |
| 3 | 3299 |
| 4 | 3472 |
| 5 | 4843 |
| 6 | 2889 |
| 7 | 3348 |
| 8 | 3549 |
| 9 | 2911 |
| 10 | 2766 |
Previously-recorded velocities on this Two-Box Chrono were all over the place from detecting neighboring lanes
The user manual does state that the Two-Box Chrono can pick up other rounds fired within 30 feet. This may be quite challenging for some users who only have access to busy ranges.
Fortunately, the range was empty when I performed my tests. I brought along some small bubble levels and used them to ensure that both sensor boxes were perfectly level. This was a cheap solution, so I recommend picking some up for yourself if you choose this chronograph. Ideally, the manufacturer would provide them, or the sensor casings would have levels built-in.

Inexpensive bubble levels will improve the setup process for the Two-Box Chrono
One other thing worth mentioning about the setup process: Chronographs like this are designed to be placed downrange and, in my experience, can take a bit of time to set up correctly. This can be a disadvantage at busy ranges or those that go hot/cold on a timer. If it should start to rain while your range is hot, be aware that the Two-Box Chrono is not waterproof.
#4: Soldered Battery
Another noteworthy departure from traditional hardware design is that the Two-Box Chrono battery isn't removable. As far as I can tell, it's a lithium-ion cell that's been soldered, zip-tied, and hot-glued inside the case. While it is nice to have a rechargeable battery, it's also nice to know that when it eventually dies, it can be easily replaced.

Inside the Two-Box Chrono, the battery is soldered and glued in place
I'm not certain if this device would operate using an external battery pack like the LabRadar does. If so, that would at least give the owner some options if they brought it out into an area where they could not recharge it but needed to use it for several days.
I'd like to see redesigned case that allows for a removable battery compartment, or at the very least, an internal battery that's attached with a removable connector instead of solder and glue.
#5: Velocity Decay
The creator of the Two-Box Chrono seems to have heeded the following advice from Bryan Litz's book:
The good news is that there's a very basic way to mitigate these errors, and that is to separate the sensors as far apart as you can. Increasing the distance between the start and stop sensor will reduce the velocity measurement error due to sensor spacing and misalignment.
However, there's another critical piece of information:
First of all, you have to account for the bullet slowing down as it travels the distance between the various chronographs. … This is accounted for by calculating how much the bullet loses per foot, and adjusting the measured value to reflect this loss.
The Two-Box Chrono isn't the first chronograph to use a longer distance between sensors. The Oehler 35P does as well and is considered highly accurate and precise (though it uses three sensor screens to verify itself). However, it should be noted that any chronograph of this design is not providing muzzle velocity and leaves it up to the user to adjust for velocity decay. In the case of the Two-Box Chrono, this is one more task for the user to perform if they know to do so.
There is no mention of this on the website or in the owner's manual for the Two-Box Chrono, but I believe there should be. I feel that it's important for users to understand so that they get accurate velocity data and not confuse it with instrument velocity.
#6: Precision versus Accuracy
As previously mentioned, the website for the Two-Box Chrono claims an impressive 0.02% repeatability error (at 15 feet). However, the Two-Box I tested reported velocities that averaged 80 ft/s slower than the other two chronographs. I took great care to align the unit correctly, as you'll see in the video accompanying this article. Based solely on this experience and the data I obtained, I must conclude that the Two-Box Chrono may be precise, but it is not accurate.
Note: I did notice that one of the sensors was slightly tilted, so it is plausible that the unit was defective.

One of the Two-Box Chrono sensors was not installed straight, which may affect its performance
Comparison Matrices
The following tables may be helpful for potential buyers to more easily compare these chronographs side-by-side.
Specifications
| LabRadar | MagnetoSpeed V3 | Two-Box Chrono | |
|---|---|---|---|
| Released | 2015 | 2014 | 2017 |
| Price | $560 | $380 | $249 |
| Sensor type | Microwave radar | Electromagnetic | Acoustic |
| Sensor spacing | – | 5 in (0.417 ft) ± 0.005 in | 2, 6, 10, or 15 ft |
| Clock speed | – | 32 MHz | 16 MHz |
| Stated Error | 0.1% | 0.1% to 0.5% | 0.02% (at 15 ft) |
| Example Error (3000 ft/s) | ± 1.5 ft/s | ± 1.5 ft/s to ± 7.5 ft/s | ± 0.3 ft/s (at 15 ft) |
| Firmware Version Tested | 1.2.4 | 3.0.03 | – |
Qualitative
There are some aspects of these devices which can't be easily quantified. While some of the following may be a bit subjective, I do think it's helpful to create some way to rank and compare some things which are worth consideration by potential buyers.
| LabRadar | MagnetoSpeed V3 | Two-Box Chrono | |
|---|---|---|---|
| Build Quality | ⭐⭐⭐ | ⭐⭐ | ⭐ |
| Ease of Setup | ⭐⭐ | ⭐⭐⭐ | ⭐ |
| Ease of Use | ⭐⭐ | ⭐⭐⭐ | ⭐ |
| Battery Life | ⭐ | ⭐⭐ | ⭐⭐⭐ |
| Extra Data | ⭐⭐⭐ | ⭐⭐ | ⭐ |
| Case Included | ❌ | ✔️ | ✔️ |
| Mobile App | ✔️ | ✔️ (w/ XFR accessory) | ❌ |
| Calculated Stats | ✔️ | ✔️ | ❌ |
| CSV Output | ✔️ | ✔️ | ❌ |
| Removable Storage | ✔️ | ✔️ | ❌ |
| Replaceable Batteries | ✔️ | ✔️ | ❌ |
Related Work
There are a few very informative articles and books that I wanted to share. Some cover topics in greater detail than I will, such as sensor alignment. These are invaluable resources for anyone with a chronograph.
Precision Rifle Blog
If you still haven't read any of the articles on Precision Rifle Blog written by Cal Zant, I highly recommend it. For example, there's an excellent piece titled Chronograph Accuracy Tips – 15 Practical Tips to Increase Accuracy & Reliability. If you own a chronograph that uses light screens, or just want a better understanding of what can affect their performance, it's worth checking out.
Applied Ballistics

Modern Advancements in Long Range Shooting: Vol 1
$50 from Amazon
In his book from 2014, Modern Advancements in Long Range Shooting: Vol 1, Bryan Litz offers an entire chapter describing how chronographs work, their limitations, and the results of his extremely detailed comparison of seven models that were available at the time (including the MagnetoSpeed V1). This specific chapter must have been quite popular because he's made it freely available as a PDF on the Applied Ballistics website. I highly recommend reading it at least once.
The following are a few choice quotes from that chapter.
On the accuracy and precision of chronographs:
Two parameters we need to establish when talking about chronographs are: accuracy and precision. Accuracy is the ability for a chronograph to measure the true average velocity for a string of shots. This is most important when you're modeling long range trajectories in ballistics programs and need to know your bullets actual average muzzle velocity. Precision is the ability to resolve the true extreme spread and standard deviation of a string of shots. Precision is most important when you're looking at the consistency of ammunition.
It's possible for a chronograph to have high accuracy and low precision. It's also possible for a chronograph to have high precision and low accuracy.
On the inherent error of some chronographs and how it can inflate the reported standard deviation:
If you're a careful handloader who's trying to make the most consistent ammo but no matter what you do you can't get your SD below 7 or 8 fps, it might be because your chronograph has close to a 7 or 8 fps SD on its own. In other words, you could be making perfectly consistent ammo with zero SD, but the measured SD will only be as good as the combined SD of the ammo and chronograph. In fact I know many handloaders who have suffered thru this lesson the hard way.
Another topic he wrote about is velocity decay. This describes how the bullet constantly loses velocity as it moves from the muzzle to the target. This is an important factor in determining muzzle velocity based on instrument velocity when your chronograph is a few yards downrange. If you're interested in how to perform the adjusted velocity calculation yourself, Bryan published a helpful reference guide: Velocity Decay between Muzzle and Chronograph (PDF)
Useful Equations
Velocity
Consider measuring how long it takes an athlete to run 400 meters. There is a starting line and a finish line, and typically a stopwatch begins when the signal is given and stopped when the athlete crosses the finish line.
The same principle is true of a ballistic chronograph. Usually there are two or more sensors (simulating the start and finish lines) a specific distance apart (similar to the 400 meter) and a clock is triggered when the bullet passes each sensor. The basic velocity equation is used to calculate the result:
Estimated Precision
Negating the effects of velocity decay, atmospheric conditions, proper sensor alignment, and real-world device processor speed, the following equation can be used to estimate the level of precision for a standard two-sensor chronograph.
To give you an example, we'll use bullet velocity of 3000 ft/s to perform this calculation for the MagnetoSpeed V3.
This approximates to 0.023% or ±0.345 ft/s. Notice that this is considerably better than the 0.1% to 0.5% error stated by MagnetoSpeed, which should give you some idea of how much other factors can affect it.
Adjusted Velocity
For chronographs that are placed downrange, the reported velocity should be adjusted to account for the velocity decay that occurs between the muzzle and the sensors using the following formula. The adjustment factor can be found in this guide from Applied Ballistics.
Raw Data
For reference, the following are the velocity decay adjustments that were used each round. I used a distance of 9 feet to adjust the Two-Box Chrono, which is approximately the distance from the muzzle to the middle of the two sensor boxes.
| .264 142gr SMK | .224 77gr SMK | .224 77gr TMK | .224 80gr SMK | |
|---|---|---|---|---|
| G7 BC | 0.301 | 0.190 | 0.202 | 0.217 |
| Adjustment (ft/s) | 0.51 | 0.80 | 0.75 | 0.75 |
The following tables contain the unadjusted velocity readings from each chronograph, grouped by ammunition type.
6.5mm Creedmoor - 142gr SMK / 41gr H4350
Note: These rounds were fired with a suppressor. The LabRadar did not detect the first two rounds after which its sensitivity levels were adjusted.
| LabRadar (ft/s) | MagnetoSpeed (ft/s) | Two-Box (ft/s) | Two-Box Adj. (ft/s) | |
|---|---|---|---|---|
| 1 | — | 2721 | 2639 | 2646 |
| 2 | — | 2722 | 2644 | 2651 |
| 3 | 2755 | 2745 | 2667 | 2674 |
| 4 | 2753 | 2747 | 2670 | 2677 |
| 5 | 2754 | 2745 | 2670 | 2677 |
| 6 | 2751 | 2744 | 2666 | 2673 |
| 7 | 2762 | 2755 | 2675 | 2682 |
| 8 | 2755 | 2747 | 2667 | 2674 |
| 9 | 2751 | 2748 | 2672 | 2679 |
| 10 | 2758 | 2753 | 2676 | 2683 |
| 11 | 2765 | 2754 | 2677 | 2684 |
| 12 | 2754 | 2746 | 2667 | 2674 |
| 13 | 2775 | 2770 | 2687 | 2694 |
| 14 | 2753 | 2742 | 2668 | 2675 |
| 15 | 2764 | 2754 | 2679 | 2686 |
| 16 | 2749 | 2742 | 2663 | 2670 |
| 17 | 2758 | 2750 | 2671 | 2678 |
| 18 | 2748 | 2740 | 2663 | 2670 |
| 19 | 2753 | 2742 | 2667 | 2674 |
| 20 | 2764 | 2757 | 2680 | 2687 |
| 21 | 2742 | 2733 | 2656 | 2663 |
| 22 | 2761 | 2753 | 2672 | 2679 |
| 23 | 2754 | 2748 | 2668 | 2675 |
| 24 | 2756 | 2751 | 2674 | 2681 |
| 25 | 2755 | 2748 | 2672 | 2679 |
| ______ | ______ | ______ | ______ | ______ |
| Mean | 2756.09 | 2746.28 | 2668.40 | 2675.54 |
| Median | 2755.00 | 2747.00 | 2670.00 | 2677.14 |
| SD | 6.87 | 10.24 | 10.28 | 10.28 |
.223 Rem - 77gr SMK / 24gr Varget
| Shot | LabRadar (ft/s) | MagnetoSpeed (ft/s) | Two-Box (ft/s) | Two-Box Adj. (ft/s) |
|---|---|---|---|---|
| 1 | 2743 | 2745 | 2654 | 2661 |
| 2 | 2737 | 2741 | 2647 | 2654 |
| 3 | 2734 | 2737 | 2646 | 2653 |
| 4 | 2716 | 2717 | 2628 | 2635 |
| 5 | 2718 | 2717 | 2630 | 2637 |
| 6 | 2732 | 2732 | 2646 | 2653 |
| 7 | 2720 | 2722 | 2634 | 2641 |
| 8 | 2744 | 2745 | 2655 | 2662 |
| 9 | 2702 | 2701 | 2618 | 2625 |
| 10 | 2760 | 2761 | 2672 | 2679 |
| ______ | ______ | ______ | ______ | ______ |
| Mean | 2730.60 | 2731.80 | 2643.00 | 2650.20 |
| Median | 2733.00 | 2734.50 | 2646.00 | 2653.20 |
| SD | 16.85 | 17.62 | 15.78 | 15.78 |
.223 Rem - 77gr TMK / 22gr Varget
| Shot | LabRadar (ft/s) | MagnetoSpeed (ft/s) | Two-Box (ft/s) | Two-Box Adj. (ft/s) |
|---|---|---|---|---|
| 1 | 2568 | 2571 | 2493 | 2500 |
| 2 | 2527 | 2531 | 2455 | 2462 |
| 3 | 2563 | 2565 | 2487 | 2494 |
| 4 | 2534 | 2534 | 2459 | 2466 |
| 5 | 2509 | 2512 | 2435 | 2442 |
| 6 | 2577 | 2576 | 2497 | 2504 |
| 7 | 2617 | 2619 | 2533 | 2540 |
| 8 | 2611 | 2610 | 2529 | 2536 |
| 9 | 2500 | 2500 | 2427 | 2434 |
| 10 | 2585 | 2588 | 2505 | 2512 |
| ______ | ______ | ______ | ______ | ______ |
| Mean | 2559.10 | 2560.60 | 2482.00 | 2488.75 |
| Median | 2565.50 | 2568.00 | 2490.00 | 2496.75 |
| SD | 40.54 | 40.26 | 36.82 | 36.82 |
.223 Rem - 80gr SMK / 22gr Varget
Note: The USB battery pack for the LabRadar died after the 9th round in this group.
| Shot | LabRadar (ft/s) | MagnetoSpeed (ft/s) | Two-Box (ft/s) | Two-Box Adj. (ft/s) |
|---|---|---|---|---|
| 1 | 2435 | 2435 | 2370 | 2376 |
| 2 | 2449 | 2449 | 2378 | 2384 |
| 3 | 2473 | 2475 | 2403 | 2409 |
| 4 | 2467 | 2467 | 2396 | 2402 |
| 5 | 2448 | 2447 | 2376 | 2382 |
| 6 | 2563 | 2565 | 2488 | 2494 |
| 7 | 2562 | 2567 | 2486 | 2492 |
| 8 | 2454 | 2456 | 2385 | 2391 |
| 9 | 2483 | 2486 | 2411 | 2417 |
| 10 | — | 2469 | 2404 | 2410 |
| ______ | ______ | ______ | ______ | ______ |
| Mean | 2481.56 | 2481.60 | 2409.70 | 2416.00 |
| Median | 2467.00 | 2468.00 | 2399.50 | 2405.80 |
| SD | 48.09 | 46.87 | 42.88 | 42.88 |
.223 Rem - 77gr TMK / 24gr Varget
Note: The USB battery pack for the LabRadar died before this group was fired.
| Shot | LabRadar (ft/s) | MagnetoSpeed (ft/s) | Two-Box (ft/s) | Two-Box Adj. (ft/s) |
|---|---|---|---|---|
| 1 | — | 2727 | 2644 | 2651 |
| 2 | — | 2731 | 2644 | 2651 |
| 3 | — | 2725 | 2637 | 2644 |
| 4 | — | 2705 | 2621 | 2628 |
| 5 | — | 2703 | 2616 | 2623 |
| 6 | — | 2739 | 2652 | 2659 |
| 7 | — | 2755 | 2670 | 2677 |
| 8 | — | 2744 | 2657 | 2664 |
| 9 | — | 2697 | 2607 | 2614 |
| 10 | — | 2732 | 2641 | 2648 |
| ______ | ______ | ______ | ______ | ______ |
| Mean | — | 2725.80 | 2638.90 | 2645.65 |
| Median | — | 2729.00 | 2642.50 | 2649.25 |
| SD | — | 18.88 | 19.40 | 19.40 |
.223 Rem - 80gr SMK / 24gr Varget
Note: The USB battery pack for the LabRadar died before this group was fired.
| Shot | LabRadar (ft/s) | MagnetoSpeed (ft/s) | Two-Box (ft/s) | Two-Box Adj. (ft/s) |
|---|---|---|---|---|
| 1 | — | 2740 | 2652 | 2663 |
| 2 | — | 2765 | 2673 | 2684 |
| 3 | — | 2696 | 2609 | 2620 |
| 4 | — | 2724 | 2636 | 2647 |
| 5 | — | 2718 | 2630 | 2641 |
| 6 | — | 2719 | 2632 | 2643 |
| 7 | — | 2695 | 2611 | 2622 |
| 8 | — | 2708 | 2618 | 2629 |
| 9 | — | 2718 | 2627 | 2638 |
| 10 | — | 2719 | 2630 | 2641 |
| ______ | ______ | ______ | ______ | ______ |
| Mean | — | 2720.20 | 2631.80 | 2642.58 |
| Median | — | 2718.50 | 2630.00 | 2640.78 |
| SD | — | 20.54 | 19.14 | 19.14 |
Next Steps
- Don't take my word for it Have your own chronographs? Hopefully the way I conducted this comparison will help you to create your own. If so, I'd love to see your results!
- Contribute Ammolytics is a community-supported project to keep it free of ads and paid-promotions. Making purchases using the affiliate links on this site helps to fund future projects and experiments. You can also support Ammolytics on Patreon!
- Have questions or feedback? You can discuss this experiment with me on Reddit.
Special thanks
- To all of my Patrons, for their continued support which allows me to do this work
- Tom, for loaning his LabRadar
- John, for loaning his Two-Box Chrono
Before you go…
Thanks for taking the time to read this article! I enjoyed writing it and learned a lot in this process and I hope that you did too. If you have any feedback, you can email me directly if you don't prefer to use Reddit or other social media.