Project: Smart Powder Trickler
Build a phone-controlled smart trickler for under $60
There are some aspects of the reloading process which tend to be significantly more time-consuming than others. Obtaining consistent, to-the-kernel precision on every round is one of those. I've tried a lot of different tools and techniques over the years to save time without sacrificing quality. Stop me if you've heard this one… RCBS Chargemaster, modified with straws and new programming, using an OHaus beam scale and manual trickler to measure the last few kernels, tweezers to add/remove single kernels, then ditching the beam scale for a lab-grade digital scale (e.g. A&D, Sartorius)… Sound familiar?
Not long ago, the AutoTrickler came along. It uses the serial port on the back of the A&D and Sartorius scales to read the weight and trickle powder until the target weight is reached. Brilliant! Really, it performs the same task as the RCBS Chargemaster with a significantly better scale.
I've never owned an AutoTrickler. Perhaps I'm too cheap, but for me, it wasn't a perfect solution at the $200+ price point. Setting the target weight is clunky and doesn't support the load development use-case very well. It also uses a rotating trickler – a common design which suffers from clumping and overthrows.
I've spoken with Adam MacDonald (creator of the AutoTrickler) several times over the past few months about a variety of topics. He's a clever guy with good ideas and he makes some really nice gear. If you're looking for a product that works out of the box, you can buy his with confidence.
Personally, I felt it was a simple problem that I could solve with my own skill set, tools, and parts I already had rather than buying a solution. That's exactly what I did and I'll show you how you can do the same.
In a hurry? You can find the source code and some instructions over on GitHub.
Table of Contents
Disclaimers
The Open Trickler is not for sale – I simply have no interest in building and selling these units myself. Instead, I prefer to provide all of the instructions, shopping lists, and source code that you'll need to build your own.
At the time of writing, this project is fairly technical. There's plenty of work which can be done to make it easier. For now, I'd like to focus on getting more feedback and contributors to help with that workload. As things progress, I'll publish on this site to keep everyone updated with major milestones. You can subscribe below to be notified of new articles.
Lastly, it should go without saying that reloading can be dangerous if safety precautions aren't followed, and I cannot take responsibility for your actions. Use this, and any other piece of reloading equipment with care and caution.
A Quick Word About "Smart" Devices
Given my background, one might reasonably assume that I live in a technophile's dream home, surrounded by smart light bulbs, speakers, and appliances. On the contrary, I'm actually a bit of a curmudgeon when it comes to the Internet-of-Things and you'd find little of this technology in my home. I own a Nest thermostat and a few non-voice-activated Sonos speakers – that's it. These particular products are significantly better than competitive options (let's be real, every other thermostat is terrible) and solve very specific problems very well.
None of this is intended to persuade you to adopt or avoid so-called "smart tech". I decided to use this moniker to indicate its dependence on a smartphone, which can be used as an advanced remote control with just a bit of software, saving money on parts that would otherwise be used for buttons, knobs, and displays. Frankly, I didn't want to build something that reminded me of old thermostats.
All of the software for the trickler and the mobile app is open-source (a trend I hope to see more of in the future with store-bought devices). This gives you full control over the capabilities of this device, and its future. You have the ability to see how it works and to change it, as needed. I hope you do, because your contributions to this project will take it from good to great.
Open Trickler Design
Fundamentally, this is not a hard problem to solve. Read the value from the scale, run a motor that moves powder into the scale, turn off the motor when the scale reads the target weight. As with many projects, the devil's in the details and there was plenty of trial-and-error during the development process to reach a working prototype.
In this project, a Raspberry Pi is used to read the weight from the scale and run a small vibration motor (like those in mobile phones) to trickle powder. An app on your phone or tablet connects to the Raspberry Pi over Bluetooth, and is used to set the target weight and start/stop the automatic trickling process.
The inspiration to use a vibration motor instead of a rotating tube came from the Omega/Dandy trickler. Rotating tubes are great for moving a lot of powder quickly, but due to how the kernels of powder behave inside the tube, they lack precision and are prone to issues with clumping which results in dropping several kernels instead of one at a time, leading to overthrows. RCBS and other companies have tried to resolve this using a variety of different textures inside the tube – I've never noticed an improvement with any of them.
Hardware
This is not a prescriptive design. Feel free to customize it however you wish according to the tools/parts you have available, or ideas you want to try instead.
- One Raspberry Pi Zero W kit Acts as the brain for the trickler system.
- One Adafruit mini proto board or similar For constructing a simple motor-controller circuit. You could also use a mini solderless breadboard.
- One Serial to USB cable Connects the A&D scale to the Pi, so that it can read the weight and unit. Update: I previously linked to a different model of Serial to USB cable, but many people were having issues with it.
- One Null modem adapter (2-pack) Needed for the serial to USB cable listed above. Don't skip this part! It changes some wiring that's needed in order for things to work correctly.
- One 3V Mini vibration motor (15-pack) Gently vibrates the trickler tube to drop powder kernels precisely.
- Jumper wires To connect the components below to the Pi board.
- One NPN 2222 transistor or similar Like all transistors, it acts like a digital switch or relay to supply the 3.3V from the Pi's power pins to the motor.
- One 1N4001 diode or similar When the motor turns off, it creates a spike of negative voltage. This diode prevents that from going back into the Pi and frying the board.
- One 200 Ω resistor or similar Reduces the voltage from the Pi's I/O pin to an appropriate level for the transistor.
- RCBS Powder Trickler or similar Basic trickler which we will modify. I assume you already have one.
- 3/8" brass tube (enough for several) Holds the motor onto the trickler tube.
- 5/16" aluminum tube (enough for 6) Replacement trickler tube.
- 1/4-20 x 3/4" socket head screw Connects the motor to the trickler tube.
- O-rings Retains the trickler tube onto the trickler body.
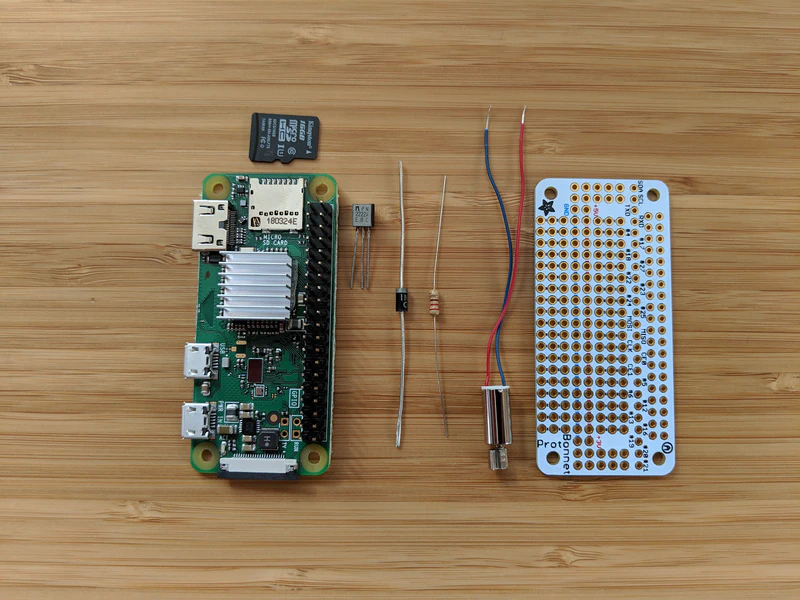
The primary electronic components of the Open Trickler design.
Assembly
Note: The instructions below are intentionally minimal. As this project develops, some steps may change and it will be easier to keep the instructions on GitHub up-to-date.
I intentionally designed this trickler to use parts you could find at any hardware store and common hand tools. I don't have a machine shop. Those who do may find this even easier.
- Assemble the electronic components (soldered onto a proto board, or with a breadboard)
- Assemble the vibrating trickler tube
- Prepare the Raspberry Pi
- Install the mobile app
- Configure your scale (instructions below)
- Start trickling!
The controller software uses PIN 12 (GPIO 18) for motor control. You can use any of the available Ground and 3.3V pins on the Pi to power the motor.
Update: The software previously used PIN 15 (GPIO 22).
The wiring of the motor was based on this helpful guide from Adafruit.
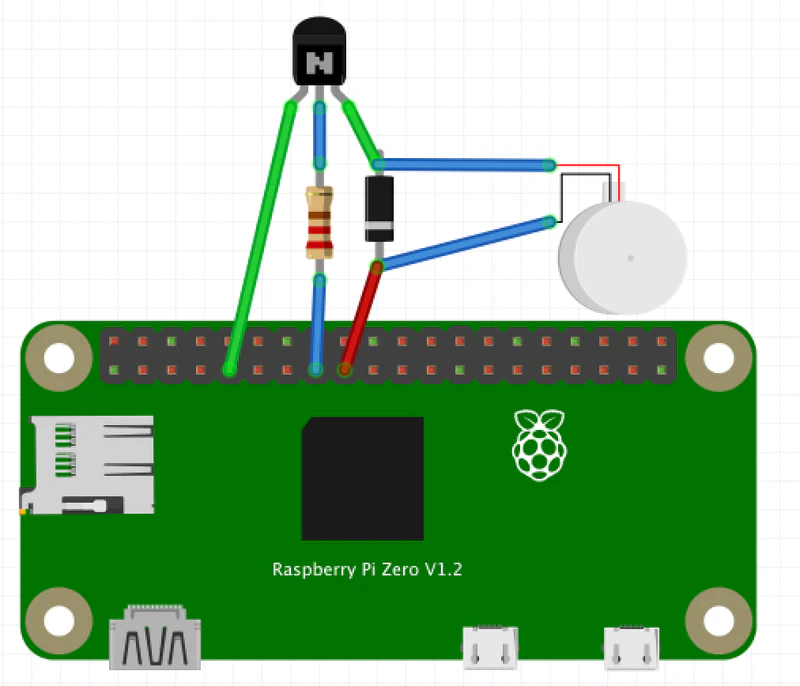
Open Trickler motor control layout.
Image shows incorrect motor PIN (see note above).
The feed tube is designed to replace the rotating, hand-powered tube in a standard powder trickler, such as the RCBS. It's a 6-inch piece of 5/16" aluminum tube, with a powder-feed hole and the motor-end tapped for 1/4-20 or 1/4-28 threads. The vibration motor is mounted within a short piece of 3/8" brass tubing that's had one end press-fit onto a socket head screw. The motor mount is screwed into the feed tube and it's ready to be installed into the trickler body.
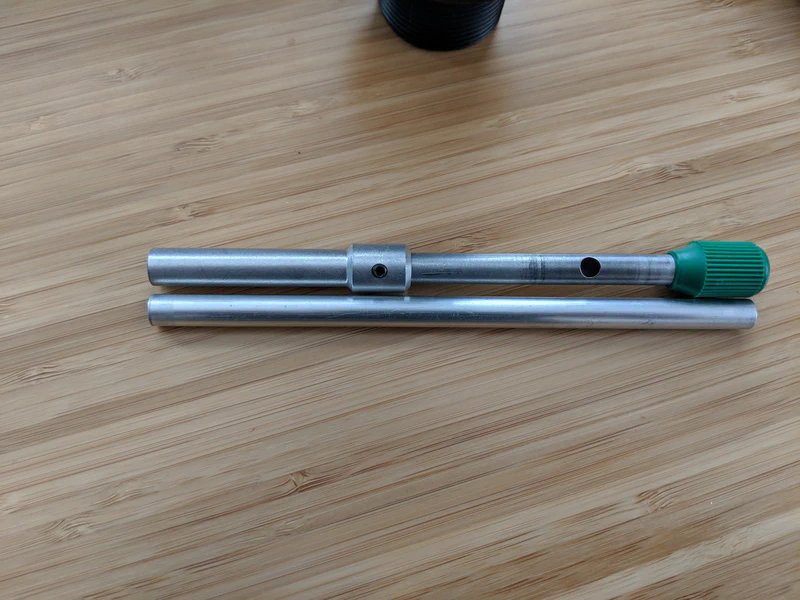
About 6 inches of aluminum tube can replace the factory trickler w/ extension.
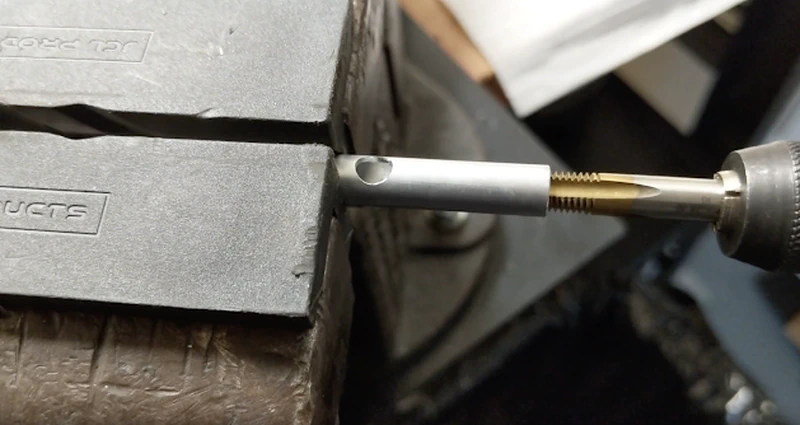
Cut a hole into the side of the tube for powder to enter, then tap the end.
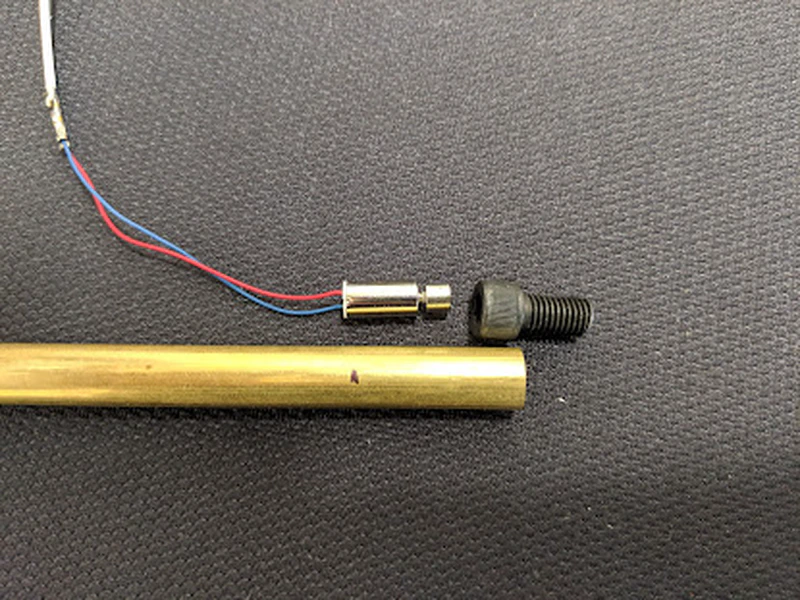
Cut a small piece of brass tube to attach the motor to the back of the trickler tube.
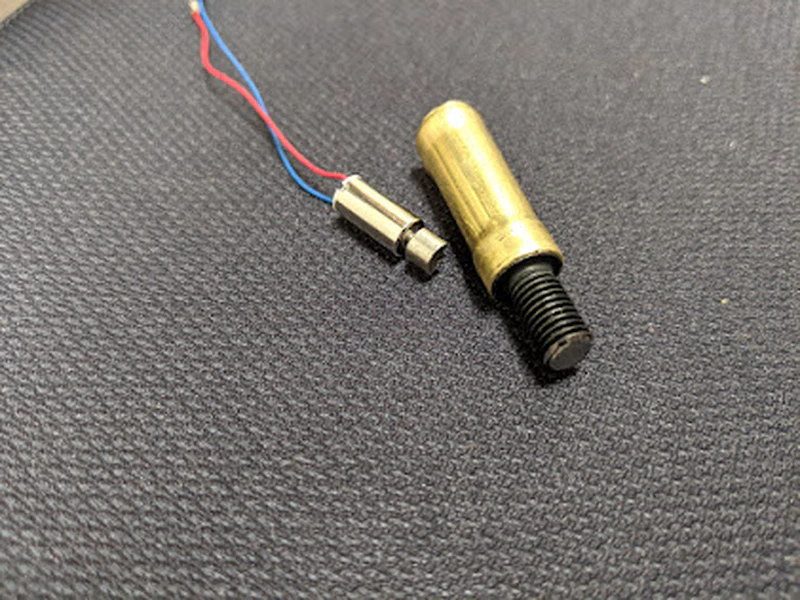
The brass tube is press-fit onto the socket head screw.
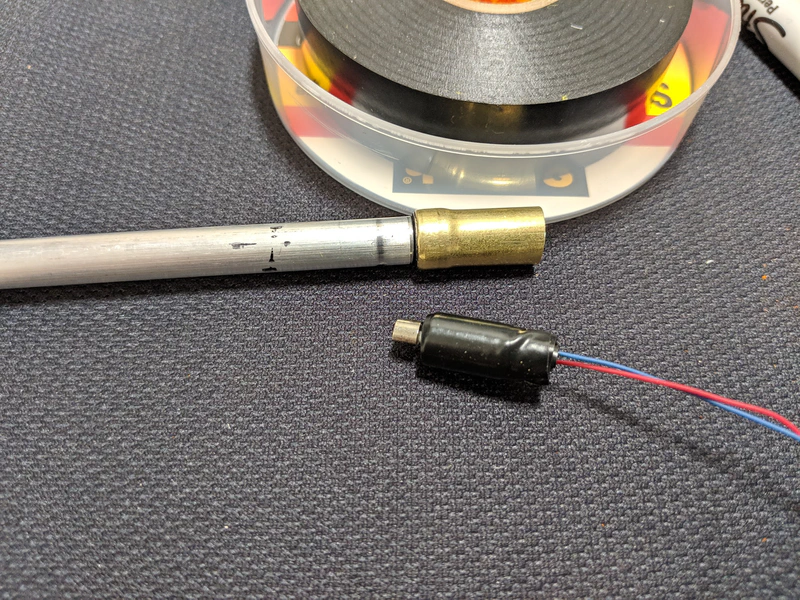
Screw it into the back of the aluminum tube, then wrap the vibration motor in some electrical tape for a press-fit.
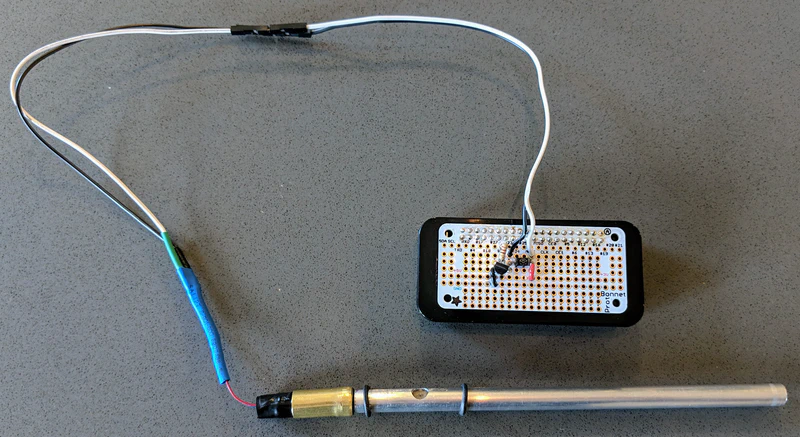
Fully assembled Open Trickler.
Controller Software
The Raspberry Pi runs a NodeJS application to act as a Bluetooth peripheral. It's responsible for reading the scale's serial port (RS232) and turning the trickler motor on/off using GPIO pins.
Despite my personal preference to use Python, the available libraries for serial port and Bluetooth did not work as expected. Additionally, the NodeJS event-driven design turned out to be more appropriate for this use-case.
You can download and learn more about the controller source code on GitHub.
Mobile App
One of the requirements I had set was that the Mobile app should be simple and intuitive. As I said before, I didn't want to make something that reminded me of the terrible interface on an old thermostat. All the app needs to do, after all, is connect to the controller, set a target weight, and start/stop trickle mode. So, we designed an app that focused on those basics and leveraged the built-in keyboard and controls that come with every smartphone.
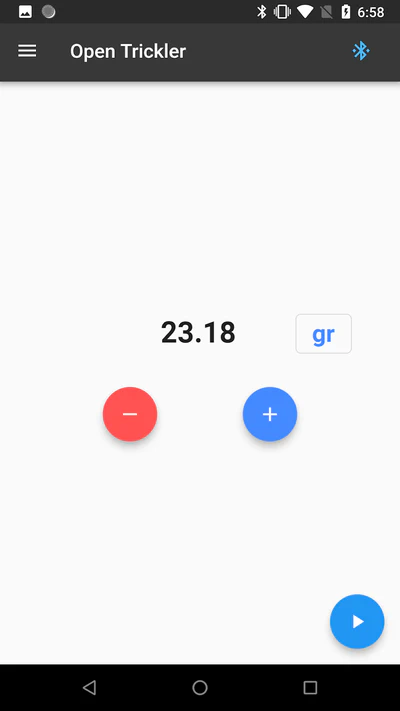
The Open Trickler leverages the phone's built-in keyboard and interfaces to avoid unnecessary work.
The app software was developed with Flutter, which allows it to be built for both Apple and Android. Update: Thanks to reader suport, the App is available for both Android and iOS devices!
- Android Get it on Google Play
- iOS Get the iOS Beta App through TestFlight
You can download and learn more about the mobile app source code on GitHub.
Prerequisite: Scale Configuration
Before you can use the Open Trickler, you'll need to change some settings on your A&D scale. Primarily, these changes will activate the serial port on the back of your scale, which the Open Trickler uses to communicate with it. You'll only need to make these changes once and they will not affect the performance of your scale or void your warranty.
Please reference the A&D manual (PDF) if you need additional help.
Response Adjustment
- Hold
MODEuntilRESPONSEis displayed, then release - Tap
MODEuntilFASTis selected, then pressPRINTReference: A&D Manual, Page 25
Data Output Mode
- Hold
SAMPLEuntilbASFncis displayed, then release - Tap
SAMPLEuntildOutis displayed, then pressPRINT - Tap
SAMPLEuntilPrtis displayed, then pressPRINT - Tap
RE-ZEROuntil3is displayed, then pressPRINT - Tap
CALto exit the menu Reference: A&D Manual, Page 38
Serial Interface
- Hold
SAMPLEuntilbASFncis displayed, then release - Tap
SAMPLEuntilSiFis displayed, then pressPRINT - Tap
SAMPLEuntilbPSis displayed, then pressPRINT - Tap
RE-ZEROuntil5is displayed, then pressPRINT - Tap
SAMPLEuntilSiFis displayed, then pressPRINT - Tap
SAMPLEuntilbtPris displayed, then pressPRINT - Tap
RE-ZEROuntil2is displayed, then pressPRINT - Tap
CALto exit the menu Reference: A&D Manual, Page 39,56
Weight Units
The Open Trickler software assumes your A&D scale is configured for just Grams and Grains. If not, the video below can help you to set that up.
Tips for Success
The recommended approach is to build a few of these units for friends or folks at your local club. Some components aren't available individually (e.g. screws, resistors, transistors, jumper wires). If you have some of these parts lying around, even better. The other benefit to this approach is that not everyone who reloads is tech-savvy, and they may need your help.
One of the more challenging parts to obtain is the Raspberry Pi Zero W. The Raspberry Pi Foundation enforces a one-per-customer rule on distributors, with the intention that everyone should have the opportunity to buy one. Micro Center is the least-expensive source for these at just $5 (in-store only). If you have one nearby, that will save you about $10-$15 on the build. Otherwise, the best option I was able to find was this kit on Amazon for $27, which includes a power supply, case, adapters, and header pins. You can add-on a 16GB microSD card for about $4.
Challenges
The following are a few specific challenges I faced during the development of this project, which might interest you.
First, I thought that I could just turn the motor on for trickling. This created way too much vibration and the powder sprayed out of the tube chaotically rather than pouring out gently. Rather than relying on variable resistors to control the voltage, I changed the software to rapidly pulse the motor on and off at specific intervals. This technique was especially useful when I wanted to drop single kernels very slowly as the target weight neared.
Second, getting the trickler to behave correctly when the powder pan was removed or placed back on the scale was also a little tricky. The naive approach was to wait for the scale to return to zero and be stable. Oddly, as the weight of the pan is removed, the scale counts down from the current weight to the negative weight of the pan, and in doing so, it eventually passes zero and sends it to the Raspberry Pi. So, after I would remove the pan, it would trickle one or two more kernels onto the empty scale and make a mess.
Another problem with this approach was that it didn't actually fit my use-case. I still used my Chargemaster to throw most of the powder into the pan before putting it back on the scale, which meant that the scale wouldn't go back to zero when I put the pan back onto the scale. The solution to these problems was to wait for the scale to read greater than or equal to zero and to have been stable for at least one second. After implementing that fix, it worked perfectly.
Next Steps
- Share your builds I'd love to see what you build and experiment with this concept! Share with me on Instagram or any other social media (links below)!
- Contribute Ammolytics is a community-supported project to keep it free of ads and paid-promotions. Making purchases using the affiliate links on this site helps to fund future projects and experiments. You can also support Ammolytics on Patreon!
- Participate You can report any issues you find or submit submit features/fixes if you'd like to help improve this project. I'll update this post periodically to credit anyone who makes major contributions.
- Have questions or feedback? You can discuss this project with me on Reddit.
Special thanks
- To Macuyler Dunn, for writing the Mobile app for this project.
Before you go…
Thanks for taking the time to read this article! I enjoyed working on this project and I learned a lot in the process – I hope you did too. If you have any feedback, you can email me directly if you don't prefer to use Reddit or other social media.
