Rifle Accelerometer Update
Contributors helped to make it six times faster
The inexpensive rifle accelerometer project was a huge hit. It was reshared and featured on other sites like Adafruit, Hackaday, ITS Tactical, and The Firearm Blog! Since then, many readers reached out to me with ideas and suggestions. I'd like to provide a quick update on the progress that's been made thanks to support from readers like you. Thank you!
In a hurry? You can find the code and instructions to build your own over on GitHub.

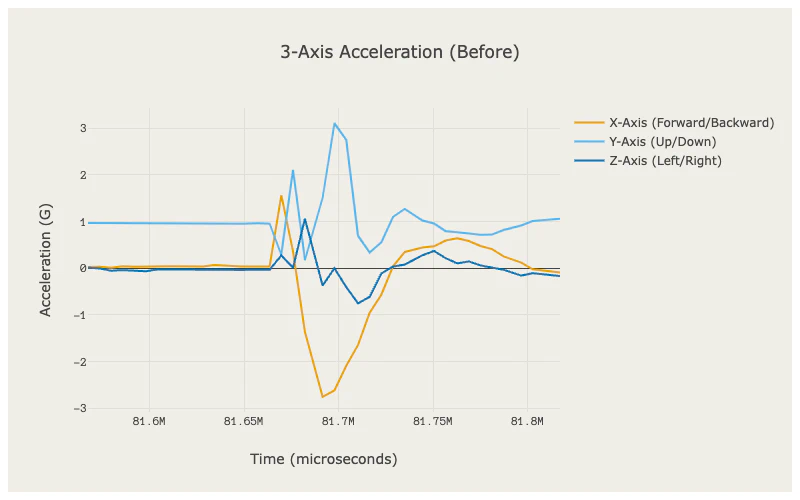
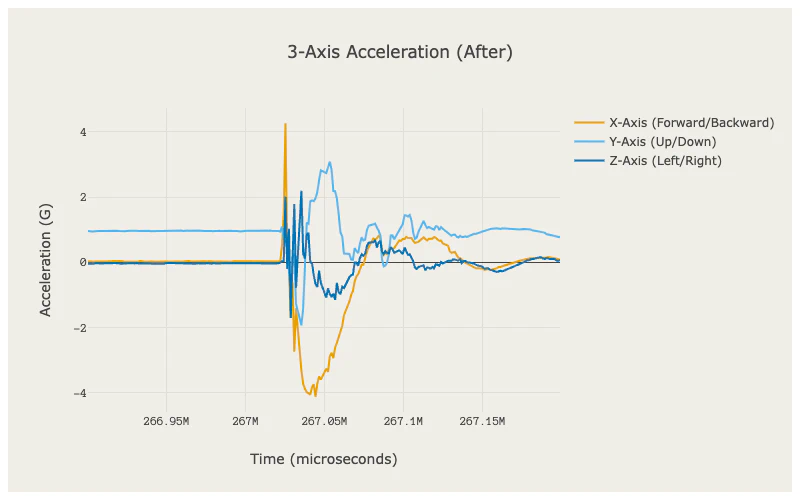
Before and after, six times faster.
Table of Contents
Overview
It's worth stating that this little accelerometer isn't my primary focus. I don't plan to sell it as a complete unit, or even a kit. Frankly, it would be a distraction from my existing research goals. I created it to collect data, then made all of the plans and information available so that everyone could do the same.
When creating devices like this, there are plenty of unknowns.
- Which data will be useful?
- What format will be easiest to work with?
- How could it be optimized?
It's not until after you have a working prototype that you can begin to answer these questions and make improvements.
What's Changed
I'm thrilled with the progress that's been made on this project since the last article. You can read all of the nitty-gritty details over on GitHub, but here's an overview of the most impactful.
- Nearly six times faster Sample-rate went from every ~6ms (140hz) to every ~1ms (750hz)!
- Fewer bytes per row The number of bytes per row dropped from ~60 to ~40 – a ~30% reduction!
- Timestamp filenames The generated filename now includes the hour and minute to help separate data and give more information!
- Increased precision
In addition to the switch from
m/s²toG, the precision has been increased to three decimal places! - Easier configuration You can customize the output with some settings at the top. No more digging through the code!
- Improved format Several changes were made to the data format that make it much easier to parse – check out the example below.
Improved Format
The most notable changes to the format are:
- The unit for each column has added to the header.
- Acceleration is now recorded in
Gwith three digits of precision. - The
microscolumn has been renamed tostart, to indicate the microsecond timing of when the acceleration was read. - Several columns have been removed:
voltage,accel unit,sensor range,millis
Changing from m/s² to G should be much more intuitive to everyone, regardless of familiarity with metric or imperial units (e.g. 1.5 G is easier to comprehend than 14.72 m/s² or 48.3 ft/s²).
| timestamp (s) | start (µs) | accel x (G) | accel y (G) | accel z (G) |
|---|---|---|---|---|
| 1550826235 | 10345471 | 0.004 | 0.980 | 0.105 |
| 1550826235 | 10347993 | 0.008 | 0.988 | 0.125 |
| 1550826235 | 10350536 | 0.000 | 1.000 | 0.137 |
| 1550826235 | 10352966 | 0.012 | 1.004 | 0.129 |
| 1550826235 | 10355519 | 0.016 | 1.000 | 0.129 |
| 1550826235 | 10360328 | 0.016 | 0.977 | 0.160 |
Improved Performance
Incredible progress has been made on the performance of the unit, thanks to the helpful feedback from some readers. Previously, it could only record one sample every ~6ms. Now it can record samples every ~1ms – nearly six times faster!
To visualize the difference, here are some example charts comparing the data from a single round.
Acceleration Chart (Before)
 interactive_space Open Interactive Chart
Acceleration Chart (After)
With the increased sample-rate, there also seems to be a bit more noise. Hopefully that can be sorted out in a future update.
 interactive_space Open Interactive Chart
Free Data, with Math
In the last article, I suggested adding a 9DOF sensor to measure the rifle's position. As it turns out, the only thing that's needed is a bit more math – which is free!
One reader, who seemed quite well-versed on the topic, suggested that integration functions could be used in post-processing to determine velocity and position. I have not yet tried this myself, but I did file a ticket with their feedback and the formulas in case anyone wants to give it a try. Having the ability to determine the position is particularly interesting, since it could be used to create a 3D model of the rifle position during a shot. This may provide specific insight into shooter-induced error that was not available before.
Barrel Harmonics
One suggested use-case that's frequently brought up is measuring barrel harmonics. I believe that the goal here would be to try and measure the harmonics "nodes", so as to enhance the load development process. It's an interesting thought, and the topic of barrel harmonics is one I plan to investigate this year.
The first thing that you'd need to know is the barrel's resonant frequency. This is vital information since it defines the minimum capabaility of the measuring apparatus.
In one conversation, it was suggested that a 30" steel barrel has a frequency of less than 5kHz. They had measured this with an accelerometer running at 250kHz, significantly faster than the 5kHz my sensor is capable of. Still, it demonstrates that with a fast enough accelerometer, it does seem possible.
Note: I've asked this person for permission to share their data on this subject. I'll update this post if I receive it.
Next Steps
- Share your builds I'd love to see what you build and experiment with this concept! Share with me on Instagram or any other social media (links in the footer)!
- Suggest improvements Anyone can suggest a feature to the project over on GitHub. Check out the list of planned improvements.
- Have questions or feedback? You can discuss this project with me on Reddit.
- Contribute Ammolytics is a community-supported project to keep it free of ads and paid-promotions. Making purchases using the affiliate links on this site helps to fund future projects and experiments. You can also support Ammolytics on Patreon!
- Participate You can create Pull Request over on GitHub if you'd like to help improve this project. I'll update this post periodically to credit anyone who makes major contributions.
Special thanks
- To everyone who wrote to me with comments and suggestions. These are crucial for making projects like this a huge success!
- To Josh Veitch-Michaelis for his incredibly helpful feedback on GitHub.
- To RipVW for his suggestions to drop some debugging data from the output.
Before you go…
Thanks for taking the time to read this article! I enjoyed writing it and learned a lot in this process and I hope that you did too. If you have any feedback, you can email me directly if you don't prefer to use Reddit or other social media.